
💡 At a Glance
- Fun Cake Pops: Colorful, festive cake pops made from scratch cake, tangy cream cheese, and a sweet candy coating.
- Time Required: Quick batter prep and a fast bake time, plus two essential chilling steps to keep them secure.
- How to Make Them: Mix the batter in your Thermomix®, bake, crumble, and roll with cream cheese into perfect cake balls.
This super easy recipe makes delicious, crowd-pleasing cake pops that are absolutely perfect for birthday parties, holiday get-togethers, or fun weekend treats!
With just a handful of basic pantry staples and a few simple steps, you can whip up these fun little cake bites in no time and totally wow your guests with your cute creations.
In my straightforward, step-by-step guide below, I’ll walk you through everything you need to know so you can make your own gorgeous cake pops in a flash!

You’re going to love these cake pops because they’re:
- The ultimate mashup of delicious cake and a lollipop.
- Super quick and easy to make, even if you’re a total beginner.
- The perfect treat for kids’ birthday parties and celebrations.
- A fun party bite to bring along for friends and family.
- Totally customizable with all your favorite toppings and sprinkles.
- A delicious, bite-sized snack for any occasion.
- A super fun way to get creative in the kitchen.
- Always a guaranteed hit with kids and adults alike!

My Top Tips for Recipe Success
Feel free to use any simple cake you like for the base—everything from marble cake to lemon cake works wonderfully here!
Pro tip: Once you’ve rolled the cake mixture into balls, they actually freeze beautifully for later.
For a rich, chocolatey twist, just mix 1 tablespoon of unsweetened cocoa powder directly into your cake mixture.
Want to switch up the flavors? Swap out the plain cream cheese for chocolate-hazelnut spread, or mix in a spoonful of jam for a fruity kick.
Instead of pre-made cake glaze, you can easily use your favorite chopped baking chocolate—just melt it gently in a double boiler or in short bursts in the microwave.

Can You Make Cake Pops Ahead of Time?
You can easily make these cake pops ahead of time! Just store them in an airtight container in the fridge for up to 3 days.
You can also freeze them! Flash-freeze the cake pops individually on a baking sheet first, then transfer them to a freezer-safe container. When you’re ready to enjoy them, just let them thaw gently in the fridge.
Fun Flavor Variations
Chocolate Cake Pops: Use chocolate cake as your base and coat with melted white chocolate. Top with chocolate sprinkles or finely chopped nuts.
Vanilla Cake Pops: Use vanilla cake and coat with dark chocolate. Decorate with rainbow sprinkles or sugar pearls for a fun pop of color.
Strawberry Cake Pops: Use strawberry cake and coat with white chocolate. Top with crushed freeze-dried strawberries or cute heart sprinkles.
Lemon Cake Pops: Use lemon cake and coat with white chocolate. Finish with a little fresh lemon zest or a light drizzle of icing glaze.

Ingredients for Homemade Cake Pops
For the Cake:
- 120 g (approx. 4 oz) butter, softened at room temperature
- 120 g (approx. 4 oz) granulated sugar
- 2 large eggs
- 100 g (approx. 3.5 oz) whole milk yogurt
- 160 g (approx. 5.5 oz) all-purpose flour
- 2 tsp baking powder (level)
For the Cake Pop Filling:
- 150 g (approx. 5.5 oz) cream cheese of your choice
For Decorating:
- 7 oz (200 g (approx. 7 oz)) cake coating or candy melts (dark chocolate or vanilla)
- 1 tbsp sunflower oil or coconut oil
- Sprinkles of choice
Note: You will find the exact quantities and step-by-step instructions below in the recipe card, which you can also print or save as a PDF file.
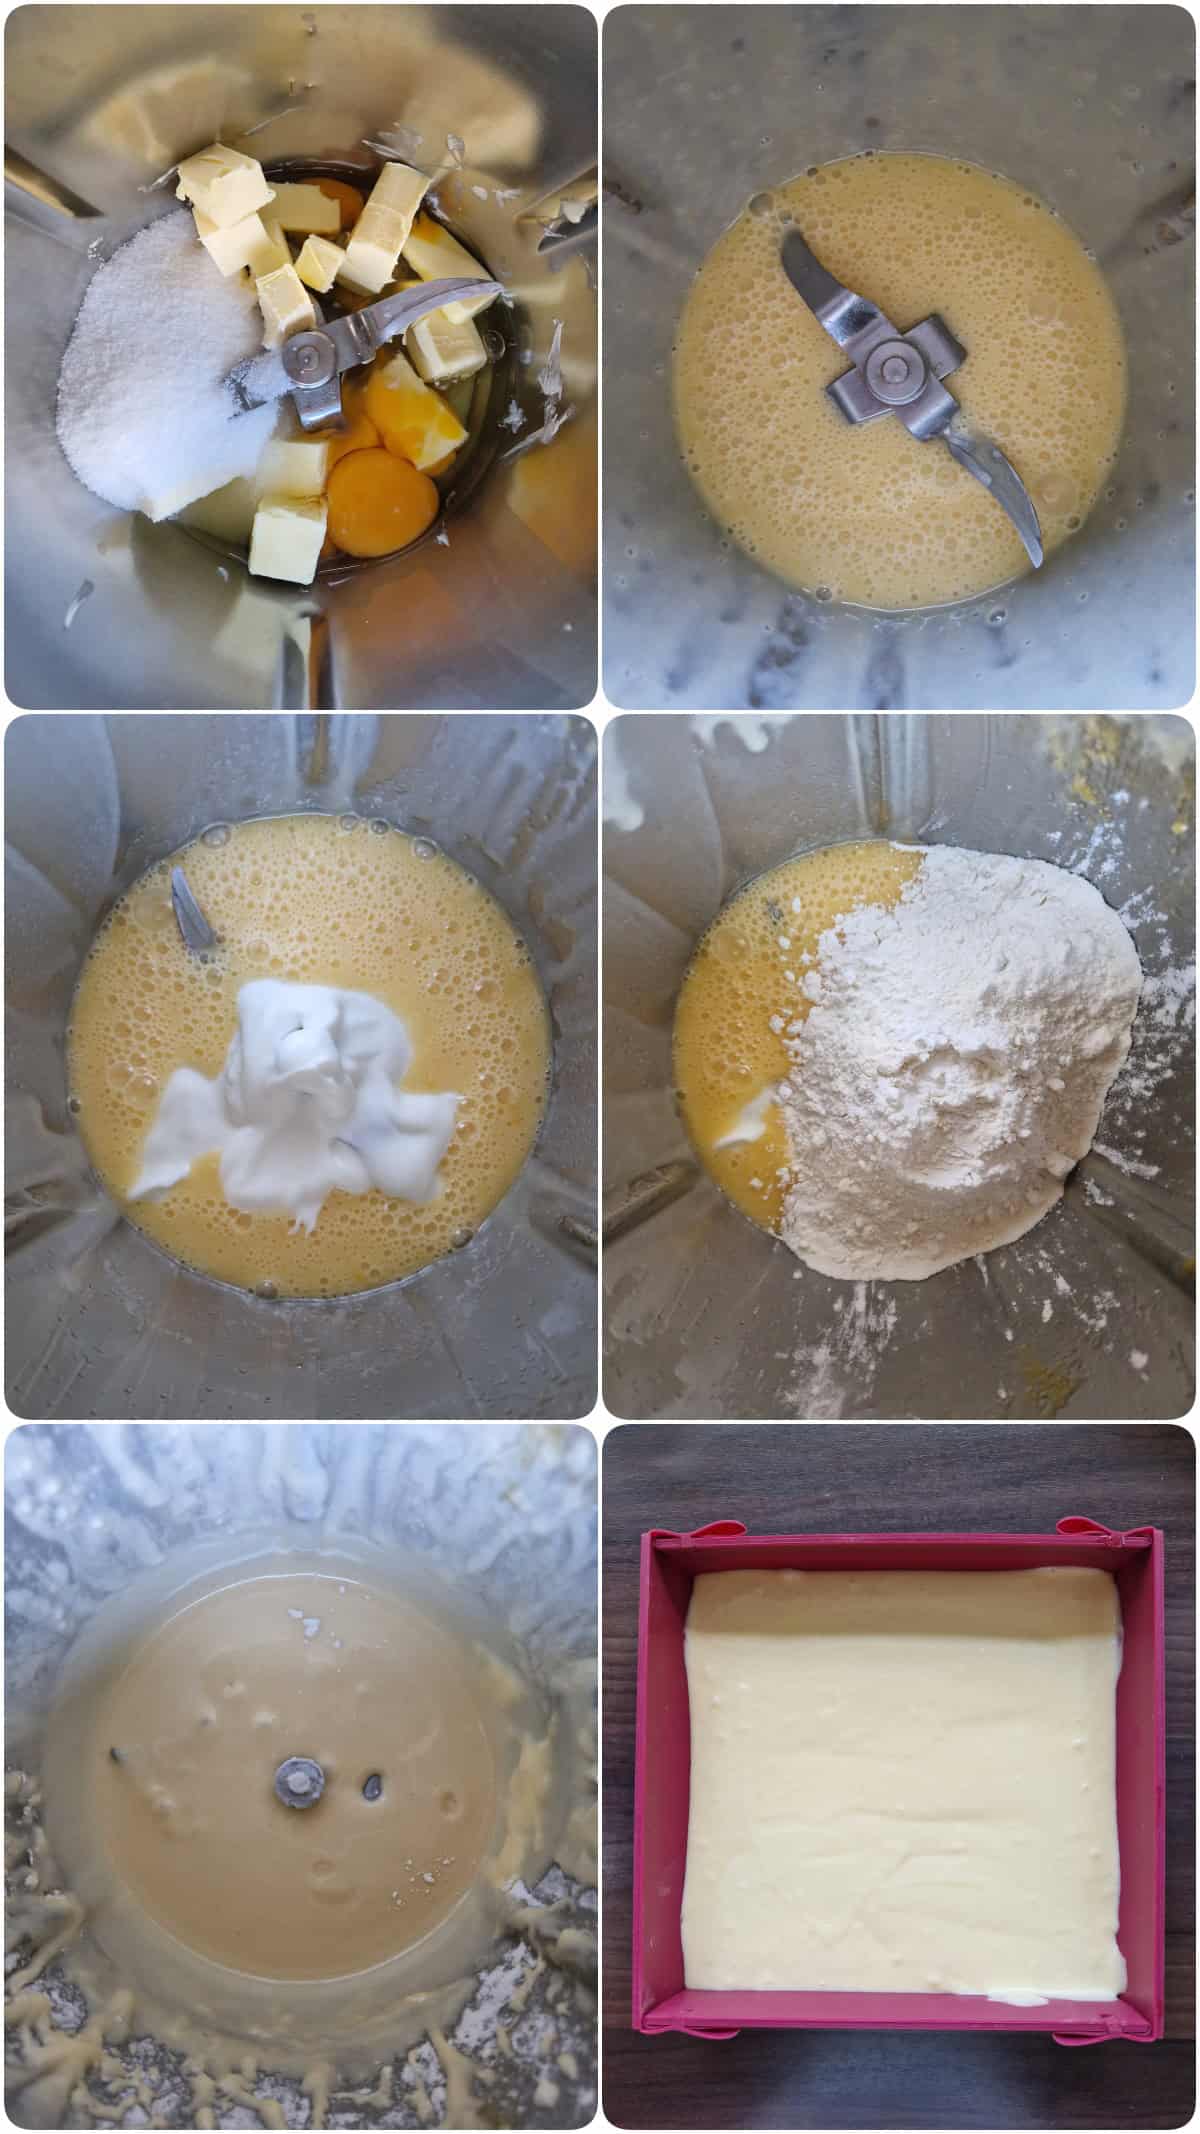
How to Make Cake Pops
Bake the cake:
First, preheat your oven to 175°C (350°F).
Next, add the room-temperature butter, sugar, and eggs to the mixing bowl and mix everything together for 1 min / Speed 5.
Pro Tip: Forgot to set the butter out to soften ahead of time? No worries! You can still use it straight from the fridge—just set your Thermomix to 1 min / 50°C (120°F) / Speed 5.
Next, add the yogurt, flour, and baking powder and mix again for 30 sec / speed 5 until a smooth batter forms.
Pour the batter into an 8-inch cake pan and bake on the lower rack of your oven for about 20 minutes.
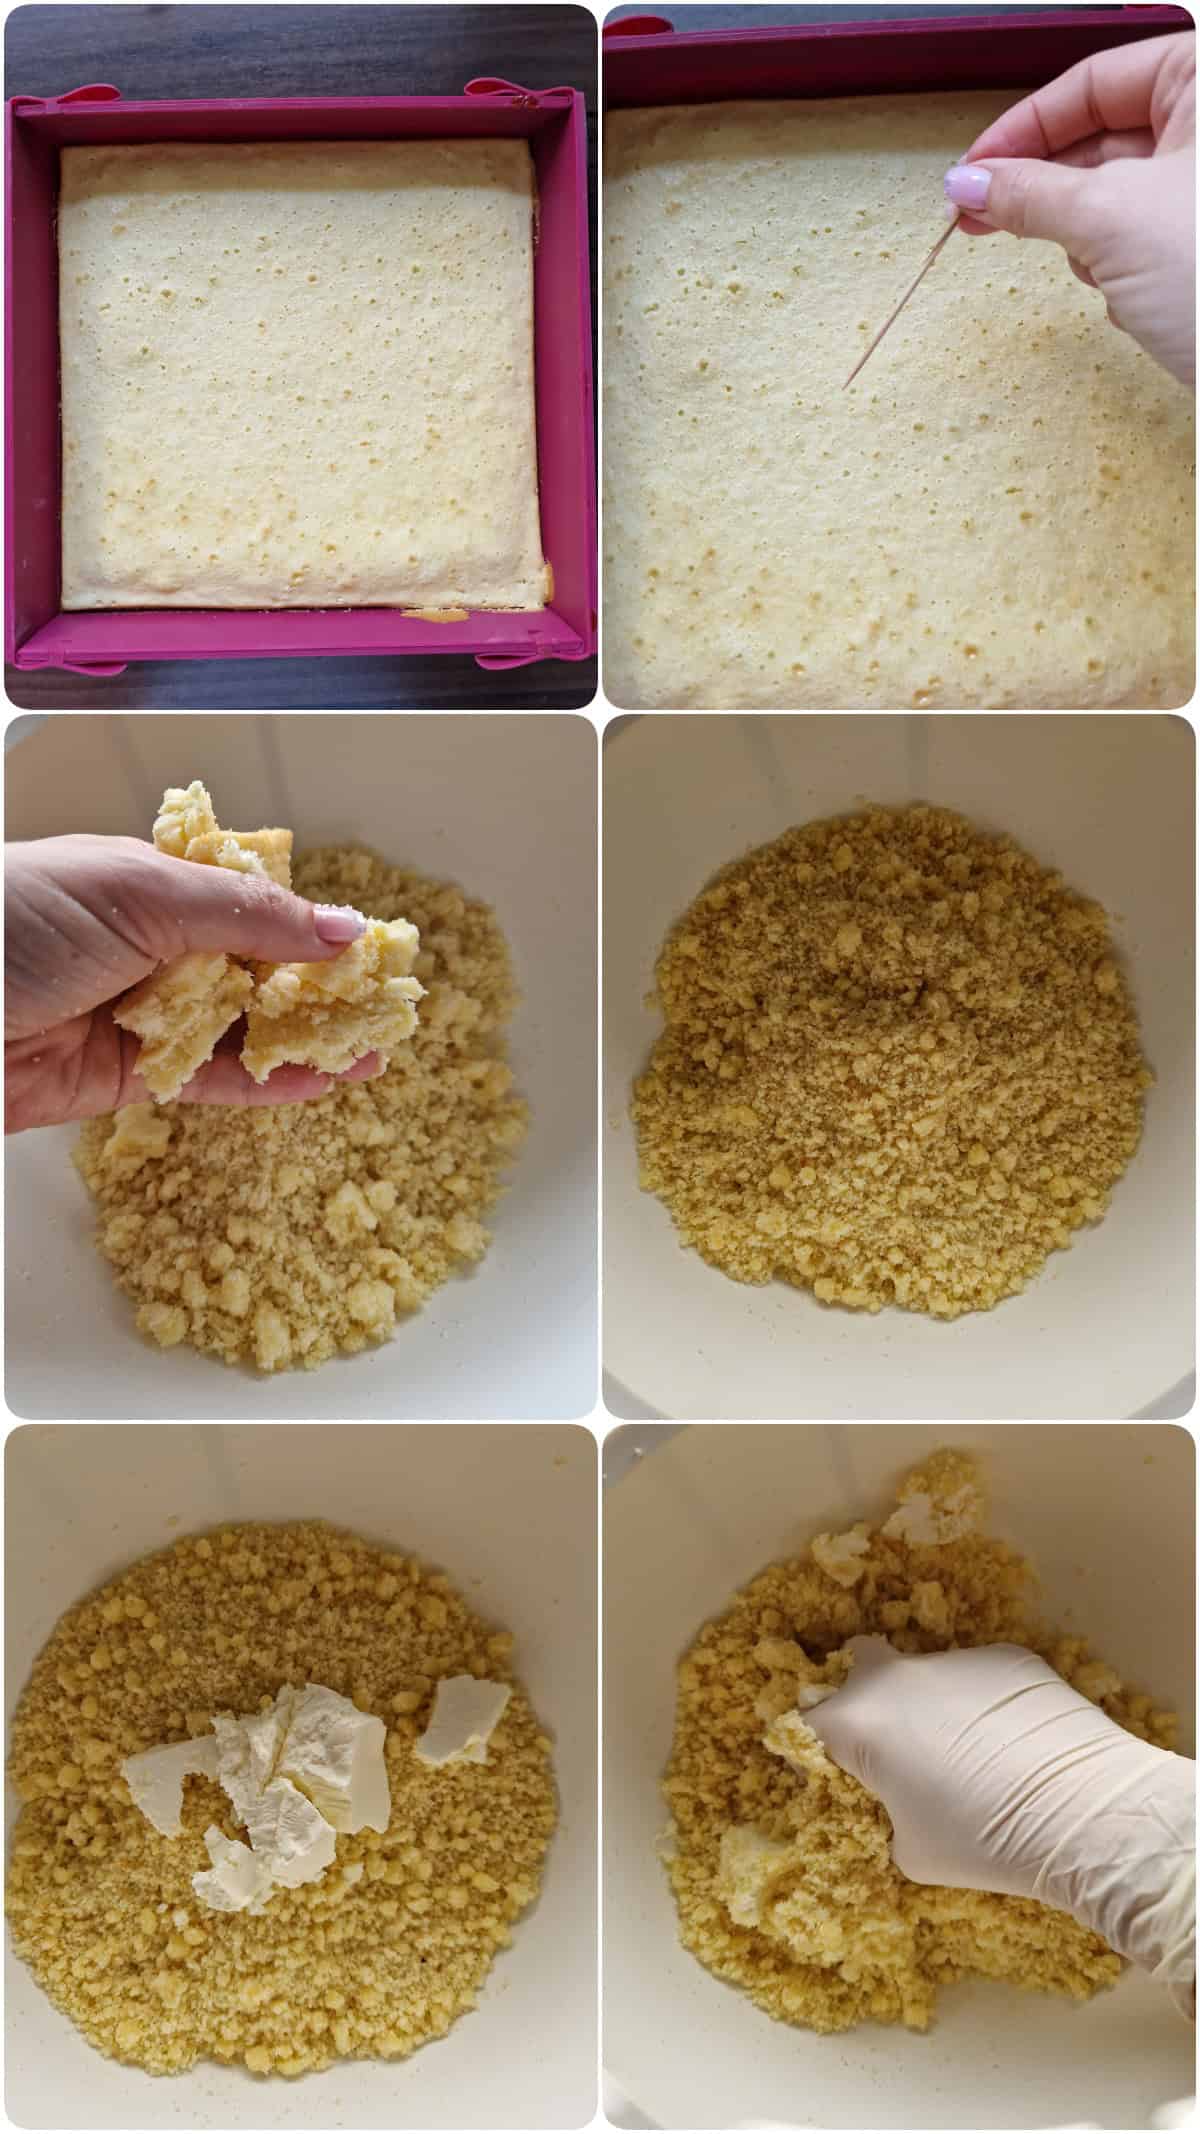
Then, test with a toothpick to check if the cake is baked through.
Just insert a toothpick into the center of the cake. If it comes out clean—meaning no wet batter is sticking to it—your cake is ready!
Let the cake cool completely.
Pro Tip: You can easily bake the cake a day ahead to save time!
Crumble the Cake and Form the Balls:
Crumble the cooled cake into a large bowl, add the cream cheese, and work everything together with your hands until it forms a smooth, cohesive dough.
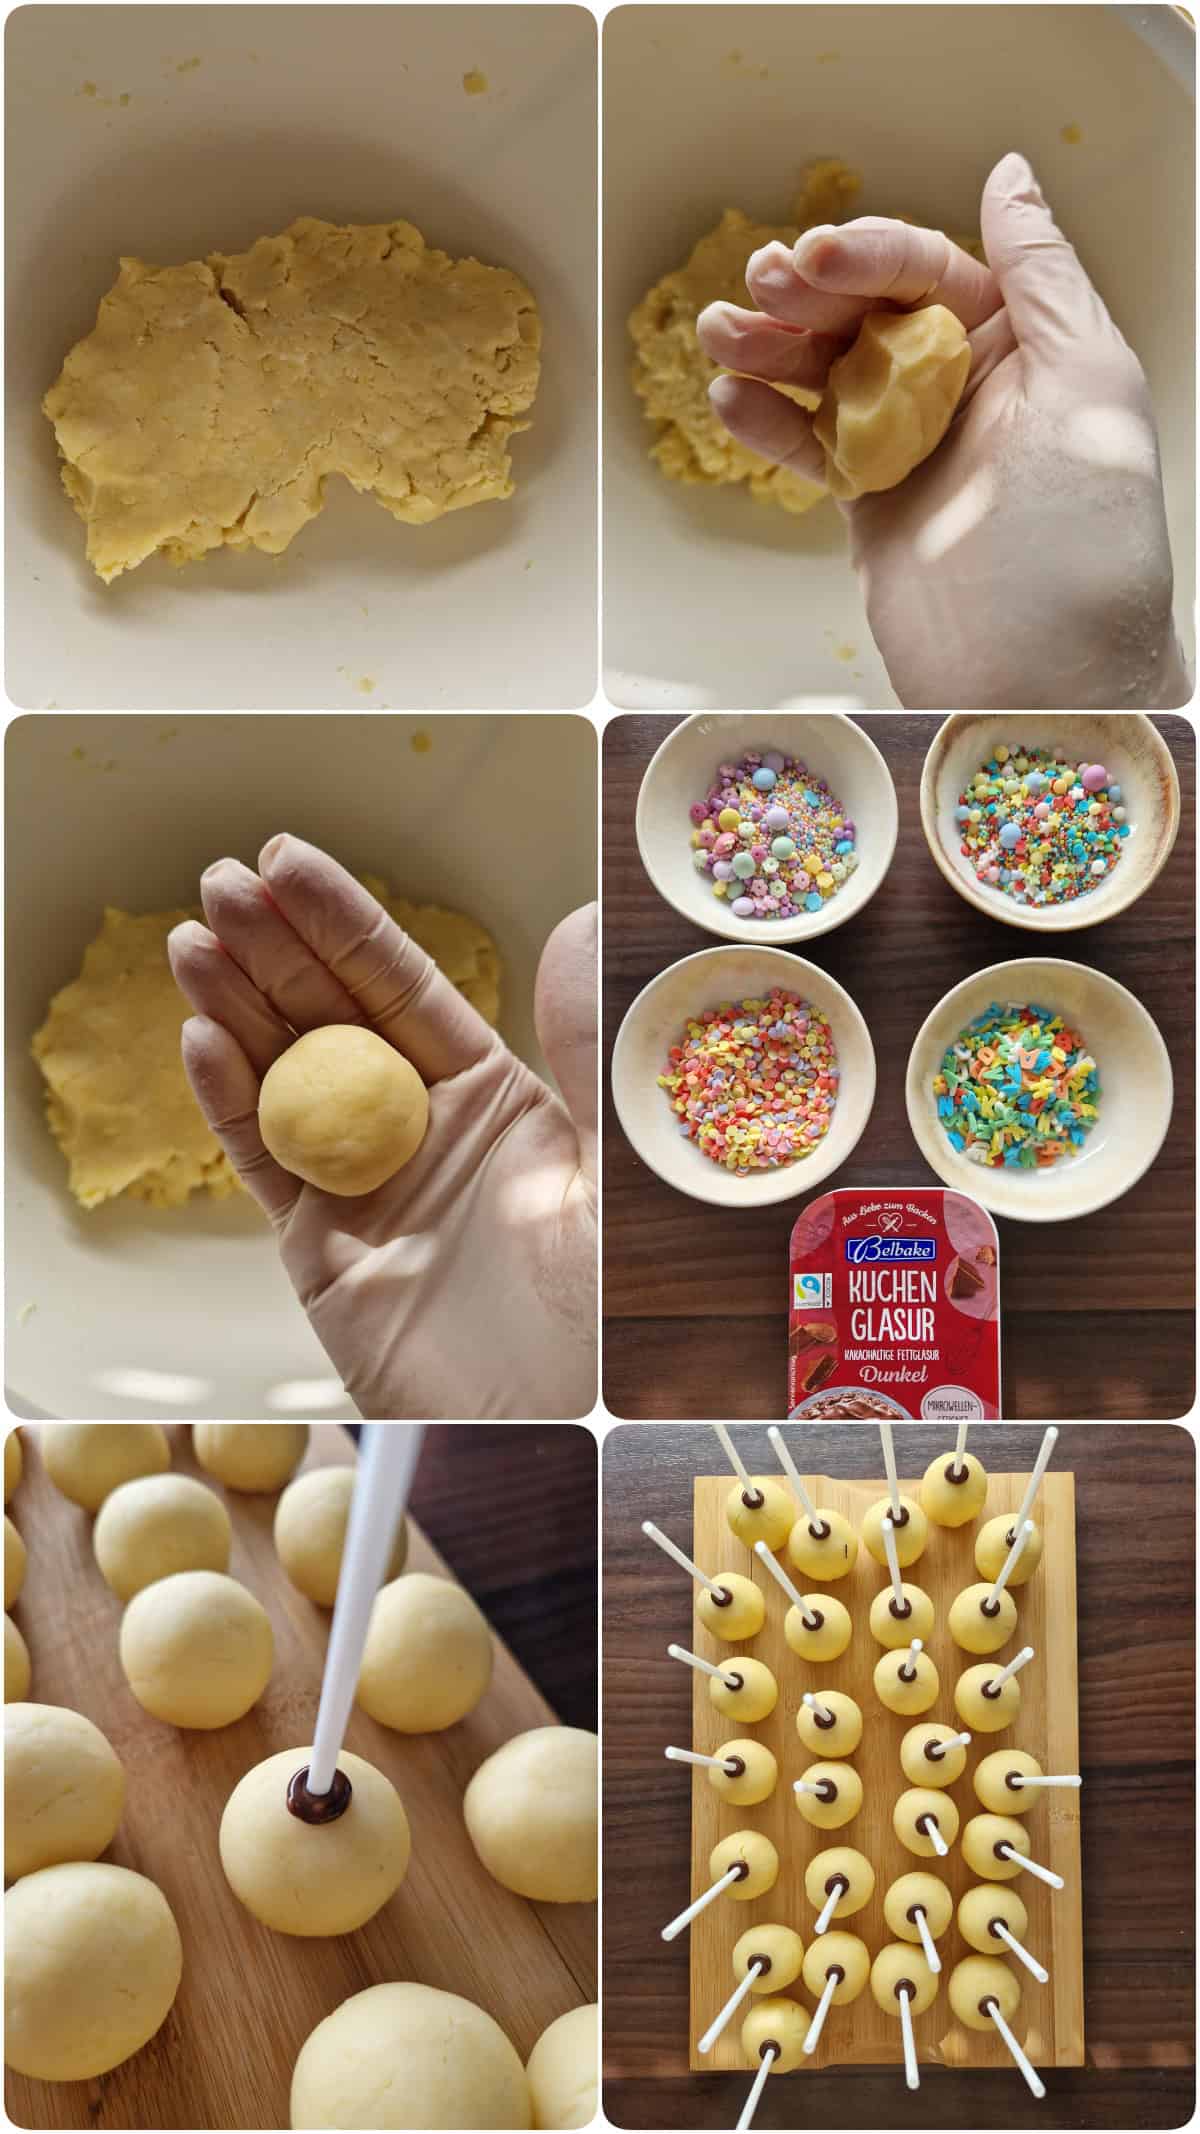
Now, roll the cake mixture into small balls (about the size of a walnut).
Important: Squeeze and knead the dough a few times in your hands before rolling it into a ball—this keeps them from cracking! If you want them all perfectly uniform, weigh the portioned dough. Mine are about 25g (approx. 1 oz) (roughly 0.9 oz) each.
Place the cake balls on a cutting board lined with parchment paper and pop them into the fridge for at least 30 minutes (or the freezer if you want to speed things up) so they can firm up.
Decorating the Cake Pops:
In the meantime, roughly chop your chocolate coating or candy melts (dark or white), place them in a microwave-safe container, and melt at low power in short intervals. (Alternatively, you can melt the coating using a double boiler over hot water).
To make the melted chocolate super silky and easy to work with, stir in 1 tablespoon of neutral oil.
Grab your cake pop sticks, dip the tip (about ½ inch) into the melted chocolate, and insert them straight into the chilled cake balls. (Don’t skip this step—the chocolate acts like glue and keeps the cake balls from sliding off the sticks later!).
Pop the cake pops (with the sticks attached) back into the fridge or freezer for about 10 minutes.
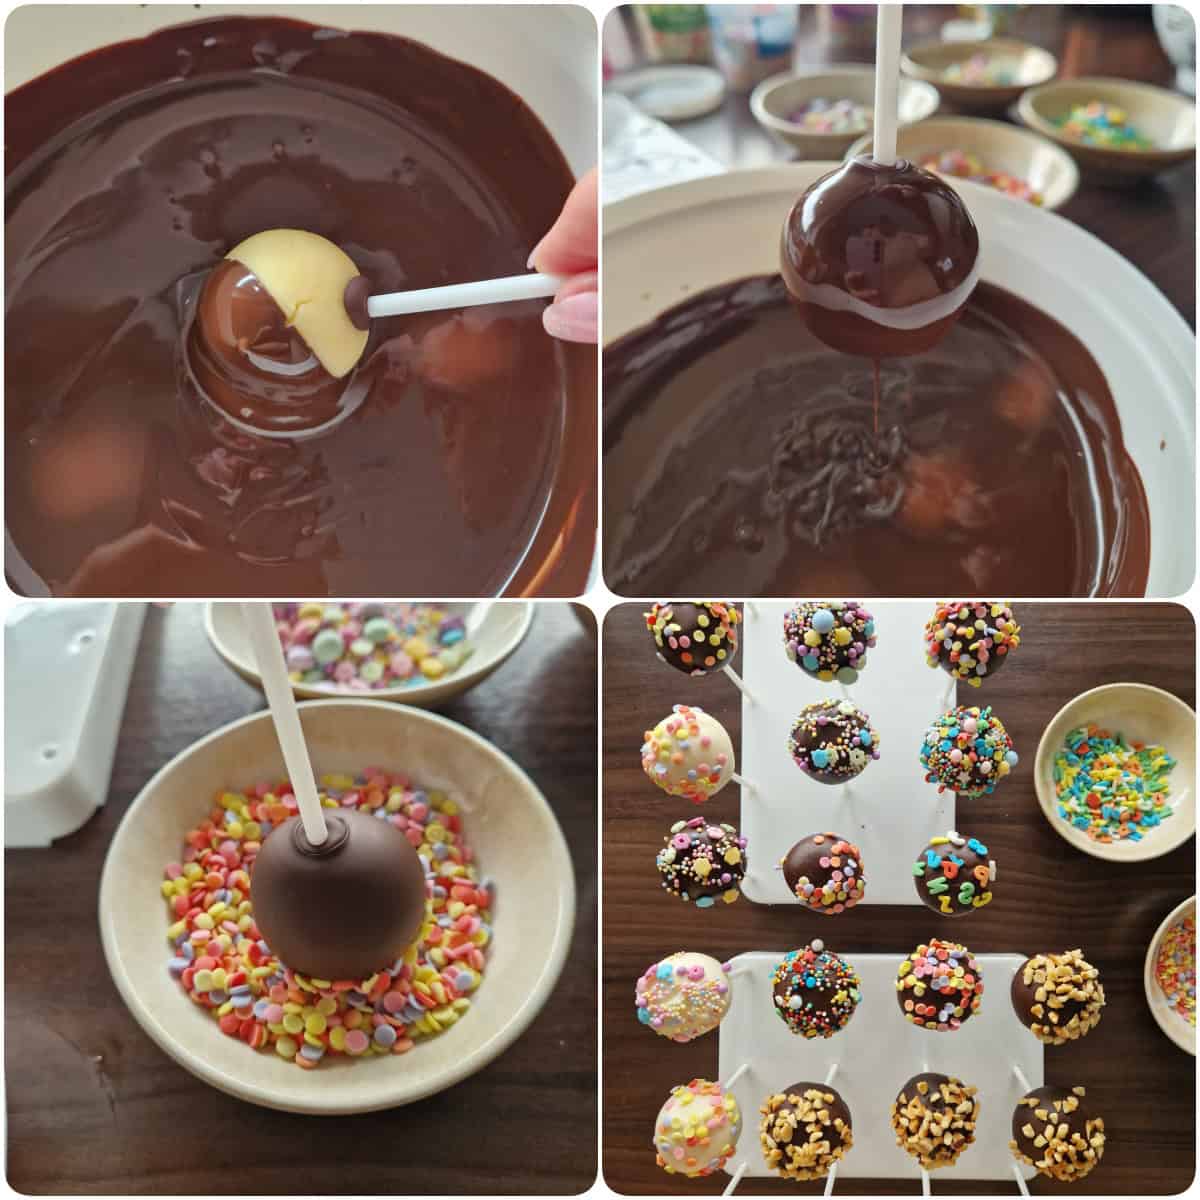
After this second chill, warm up your melted chocolate glaze again if needed. Dip the cake pops one by one into the chocolate at an angle, gently tapping off any excess. Right before the chocolate sets, decorate with sprinkles or chopped nuts if you’d like!
Pro Tip: On hot summer days, it’s best to take the cake pops out of the fridge in small batches to dip and decorate so they stay nice and chilled.
Push the decorated cake pops into a block of styrofoam so they can set upright, then store them in the fridge. They’ll stay fresh for several days!
Enjoy!
Note: You will find the exact quantities and step-by-step instructions below in the recipe card, which you can also print or save as a PDF file.

By the way, the prep times listed are just averages. Everyone cooks at their own pace, and sometimes things take a bit longer or shorter than expected.
I hope you have so much fun making these!
If you enjoyed my recipe for Cake Pops, be sure to check out my Baked Apple Cake Roll too!
Happy baking,
Christoph
Don’t want to miss any more recipes? Follow me on:
Have you tried this recipe?
If you liked my recipe or if you have any questions or tips about the recipe, please leave a comment and rate the recipe with 5 stars. Tag your picture on Instagram with @thermokoch.de so that I can see it 🙂


Cake Pops
Click the stars to leave a rating & comment
Print Pin recipe Start cookingIngredients
For the cake:
- 120 g Butter room temperature (approx. 4 oz)
- 120 g Sugar (approx. 4 oz)
- 2 Eggs medium
- 100 g Yogurt whole milk (3.5% fat) (approx. 3.5 oz)
- 160 g All-purpose flour (approx. 5.5 oz)
- 2 tsp Baking powder level
For the cake pop mixture:
- 150 g Cream cheese of choice (approx. 5.5 oz)
For decorating:
- 200 g Candy melts or chocolate coating dark chocolate or vanilla (approx. 7 oz)
- 1 tbsp Sunflower oil or coconut oil
- Sprinkles of choice
Instructions
Bake the cake:
- First, preheat your oven to 175°C (350°F) (conventional top and bottom heat).
- 120 g (approx. 4 oz) Butter, 120 g (approx. 4 oz) Sugar, 2 EggsAdd the room-temperature butter, sugar, and eggs to the mixing bowl and blend for 1 min / speed 5.
- 100 g (approx. 3.5 oz) Yogurt, 160 g (approx. 5.5 oz) All-purpose flour, 2 tsp Baking powderAdd the yogurt, flour, and baking powder, and mix for another 30 sec / speed 5 until you have a smooth batter.
- Pour the batter into a cake pan (about 20°C (70°F)m in diameter) and bake in the lower third of the oven for about 20 minutes. Test for doneness using a toothpick: insert a toothpick into the center of the cake—if it comes out clean with no wet batter sticking to it, your cake is done!
- Let the cake cool completely.
Crumble the cake & shape into balls:
- 150 g (approx. 5.5 oz) Cream cheese of choiceCrumble the cooled cake finely into a large bowl, add the cream cheese, and knead everything together by hand until it forms a smooth, cohesive dough.
- Roll the cake mixture into small, walnut-sized balls.
- Place the cake balls on a cutting board lined with parchment paper and chill in the fridge for at least 30 minutes (or pop them in the freezer to speed things up!) so they can firm up.
Decorate the cake pops:
- 200 g (approx. 7 oz) Candy melts or chocolate coatingIn the meantime, roughly chop your chocolate coating or candy melts (dark or light), place it in a microwave-safe bowl, and melt at low power in short bursts. (Alternatively, you can melt it in a heatproof bowl set over a pot of simmering water—a double boiler).
- 1 tbsp Sunflower oilTo make the melted chocolate extra silky and smooth for dipping, stir in 1 tablespoon of oil.
- Dip about 1 cm of the tip of each cake pop stick into the melted chocolate, then press it straight into the center of a chilled cake ball. (This acts like glue and stops the cake pops from slipping down the stick later!).
- Return the cake pops (now with sticks inserted) to the fridge or freezer for another 10 minutes to set.
- Sprinkles of choiceOnce chilled, warm up the coating again if needed. Dip each cake pop into the melted chocolate at an angle, gently tap off any excess, and right before the coating sets, decorate with sprinkles or chopped nuts of your choice!
- Push the decorated cake pops into a block of styrofoam (or a cake pop stand) to dry, then store them in the fridge. They’ll stay fresh for several days!
- Enjoy!
Notes
- You can use any simple sponge or pound cake here! Everything from marble cake to lemon cake works beautifully.
- The rolled cake balls freeze super well, too.
- For a rich, chocolatey twist, just add 1 tablespoon of unsweetened cocoa powder to the cake batter.
- Instead of plain cream cheese, try a chocolate hazelnut cream cheese spread or swirl in a little jam for different tasty flavor variations.
- Instead of pre-made cake coating or candy melts, feel free to use high-quality baking chocolate melted over a double boiler.


